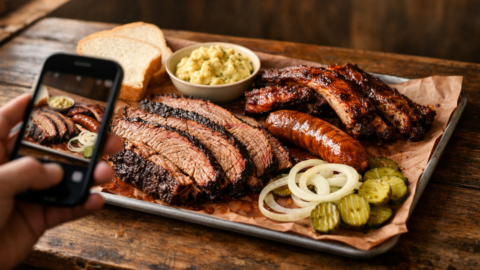
There is a moment every BBQ fan knows: your tray lands on the table, the brisket is still glistening, the ribs are stacked just right, and the sides look every bit as good as you hoped. You want to grab a quick photo before digging in, but somehow the picture ends up dark, flat, and nowhere near as impressive as the real thing.
Good BBQ deserves better.
If you want to capture a tray in a way that actually reflects the pitmaster’s work, you do not need expensive gear or a professional camera. You just need a few smart habits, a little awareness of light, and a quick plan before the food cools off. Whether you are posting to social media, saving the stop in your BBQ Passport, or just documenting a memorable meal, these tips will help you take better BBQ tray photos with your phone.
Start with the light
The fastest way to improve a BBQ photo is to pay attention to where the light is coming from.
Look for natural light first
If possible, choose a table near a window or step outside into open shade. Soft natural light helps bring out the bark, the smoke ring, the rendered fat, and the real color of your sides. It makes the tray look closer to how it looks in person, which is always the goal.
Be careful with harsh indoor lighting
A lot of BBQ joints are built for eating, not photography. Overhead fluorescent lighting can flatten the texture of the meat, wash out the color, and cast awkward shadows across the tray. If the room is dim, shift your angle or move closer to better light before taking the shot.
Skip the direct flash
Phone flash usually makes BBQ look worse. It creates shiny spots on grease, strips away texture, and can make the food feel cold and artificial. If you need a little extra brightness, use another phone’s flashlight from the side instead of blasting the tray head-on.
Take the full tray shot first
Before anyone grabs a slice or starts moving sides around, get the overhead photo.
Use the classic overhead angle
Stand over the tray and hold your phone directly above the center. This angle works well because it shows the full spread in one frame and gives viewers a sense of scale, variety, and balance.
Clean up the frame a little
Your tray does not need to look staged, but it should not look chaotic either. Tuck in the bread, onions, and pickles so they frame the meat nicely. Wipe away any big sauce smears on the rim. Keep the tray centered and try to line up the edges so the photo feels neat without looking overly posed.
Get a close-up for texture
Once you have the full shot, move in for detail.
Focus on bark, fat, and edges
Bring your phone down closer to butcher-paper level and aim at the brisket bark, the rendered fat, or the cut side of a rib. This is the kind of shot that makes people stop scrolling. Texture is everything in BBQ photography, and close-ups help show what makes the tray special.
Tap to focus on the meat
Do not leave the focus up to your phone. Tap the screen where the meat looks best, especially on the moist part of a brisket slice or a rib with a nice cut edge. That helps the phone expose the shot properly and keeps attention where it belongs.
Show the smoke ring and slice pattern
BBQ fans notice the details, and a few small adjustments can make those details stand out more clearly.
Fan brisket slices slightly
If the brisket is stacked tightly, gently spread the slices into a slight fan. That creates a cleaner pattern and helps show the bark, the edge texture, and the moisture in each slice.
Turn ribs toward the camera
If you are photographing ribs, angle them so the cut side or bitten side faces the lens. That makes it easier to see the smoke ring and the way the meat sits on the bone.
For video, keep it simple
Short BBQ videos can work great, especially for social media, but restraint matters.
Use a gentle brisket press
If you are filming a brisket slice, a light press is enough to show moisture and tenderness. You are trying to reveal the quality of the meat, not squeeze all the juice out before lunch.
Keep clips short and natural
A quick close-up of the bark, a slow pan across the tray, or a brief shot of sliced brisket will usually do more than an overdone video sequence. Let the food carry the moment.
Make a quick edit before posting
You do not need to heavily edit a BBQ photo. A few small adjustments usually do the job.
Add a little structure and sharpness
A slight bump in sharpness can help the bark stand out and make the texture look more defined.
Warm it up just a touch
BBQ is warm, rich, and inviting. A small increase in warmth can help the tray feel fresh off the pit instead of pale or dull.
Use contrast carefully
A little extra contrast can deepen the bark and brighten the smoke ring, but too much will make the photo look unnatural. The best edits still feel honest.
Common mistakes that can ruin a good tray photo
Even a great tray can look disappointing if a few details get overlooked.
Letting the tray sit too long before taking the picture
BBQ changes quickly once it hits the table. Steam fades, fat starts to set, and sliced meat begins to lose that fresh, juicy look. Get your shots done fast, ideally in the first minute, then start eating.
Settling for bad lighting
If the lighting is too dark or too harsh, the photo is fighting an uphill battle from the start. A great tray under poor light can end up looking dry, gray, or lifeless. Whenever possible, move the tray or change your angle instead of forcing a bad shot.
Leaving distracting items in the frame
Phones, keys, wallets, drink cups, crumpled napkins, and random table clutter can pull attention away from the food. Before you shoot, take a second to clear the area around the tray so the meat stays the star.
The quick BBQ tray photo checklist
Before you dig in, run through this short checklist:
- Wipe your camera lens.
- Find the best available light.
- Take one overhead tray photo first.
- Get one close-up of bark, fat, or the smoke ring.
- Tap to focus on the meat.
- Clear distracting clutter from the frame.
- Finish quickly so the food stays hot.
Respect the tray, then enjoy it
The best BBQ photos do not feel overly staged. They feel honest, appetizing, and true to the moment. A quick, thoughtful photo can capture the craft, the care, and the reason that stop mattered in the first place.
So next time a beautiful tray lands in front of you, give it the quick attention it deserves. Catch the glisten, show the bark, and snap the shot before the first bite.
Then eat.
Show us your best tray shots
Got a BBQ tray photo you are proud of? Tag @ExploringBBQ on Instagram or add your photo to your BBQ Passport entry for that stop. We love seeing how the community captures the full Texas BBQ experience.
Internal link suggestions
- Link to your BBQ Passport page
- Link to the BBQ Joint 101 category
- Link to a BBQ glossary post for terms like bark, smoke ring, and rendered fat
- Link to a Texas city BBQ guide or restaurant directory page
Social cutdowns
Caption option 1
Your BBQ tray deserves better than bad lighting and a blurry photo. Here are a few simple ways to get a better shot before the first bite.
Caption option 2
Want better brisket photos with just your phone? A few small lighting and angle changes make a big difference.
Caption option 3
Before you eat, take 60 seconds and get the shot right. Better light, better angles, better BBQ photos.
Visual ideas
- Hero image of a brisket tray near window light
- Overhead tray shot with brisket, ribs, pickles, onions, bread, and sides
- Close-up of bark and rendered fat on sliced brisket
- Side-by-side graphic showing better light versus poor overhead light
Helpful gear for your cook
A natural fit here would be a short BBQ photo kit recommendation block with:
- Microfiber lens cloth
- Small phone tripod
- Clip-on phone light
- Compact phone grip